Showing posts with label Art. Show all posts

Sunday, August 24, 2014

The New School Room

The school room is finally finished and ready for sharing!

After negotiating with Dean for some more space, we decided to clear the front room to make a dedicated room for homeschool. (Surprisingly, even after 7 years of homeschooling, we never had a dedicated space to work in. We would either cram around a desk in the office, or the kitchen table, or spread out in the living room... it was never ideal.) Our supplies and books were never all together in the same place. The piano got moved to the living room (sorta sad about that because now that room looks and feels cramped), and Dean and Jordan's maker space was taken down and may be set up again in the basement. It was a problem anyway because the little boys would not leave the tools alone. With the room clear, in the two weeks before my knee surgery I painted the walls like a mad woman, completed an art project, we made a trip to Ikea and we hung up new window treatments. I am so excited with the results!! I have dreamed of this room for years...

Here is the before. This was a golden yellow paint. I loved this color... In the mornings, when the sunrise would light up this side of the house, it would just glow - not in an irritating way..more like a soft glow, like warm baked bread. I remember picking out this paint. I was newly single, and picking out some chairs at LazyBoy. This yellow was used in the showroom in a little family room setting, and I just knew I had to have it. I got the paint (Benjamin Moore), and painted some rooms this color, and chose a softer yellow for other walls. Over the years, it got a bit dingy. Well, a lot dingy. I had also unfortunately used a flat paint, so I couldn't scrub pencil, marker, greasy hand prints or anything else off of it. By painting day, I was overjoyed to see it go. I was also excited that the very ugly brass light fixture that illuminated *nothing* was on its way out the door as well.


Here is the after...


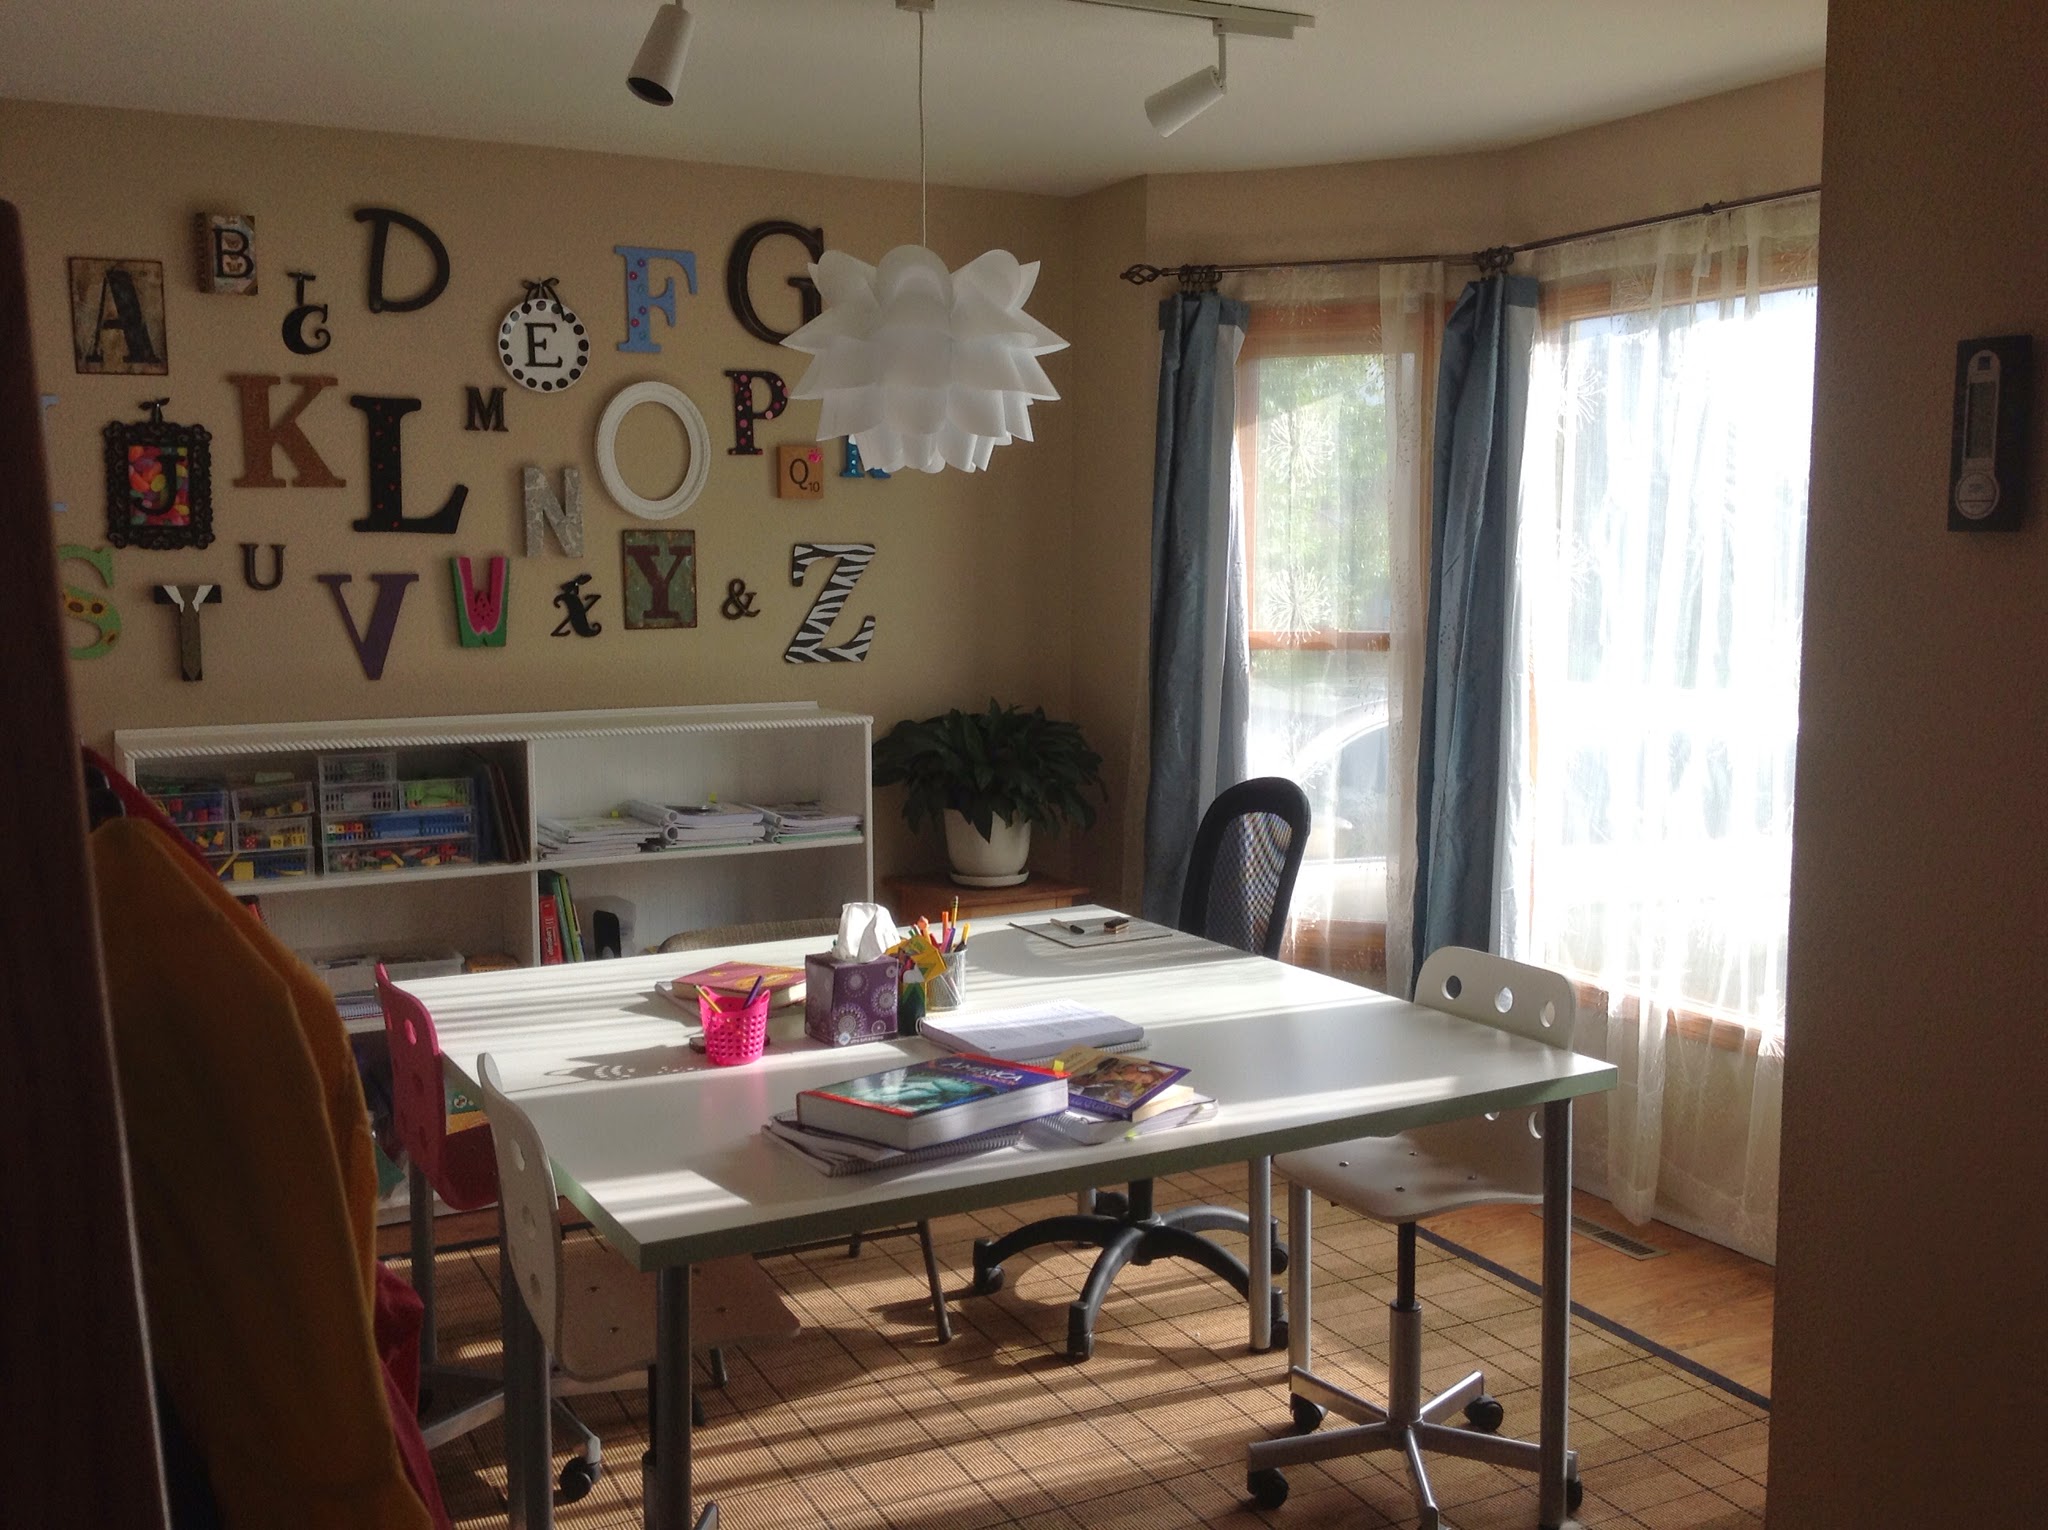
I have True Confessions of a Homeschooler to thank for the inspiration for the desk. Had our bank account been able to take the full hit, we would have done the four separate drawer units as well, but....in using it for the past few weeks as it is right now, I like the airiness of it just being the table, alone. We made the trip to Ikea in late July, making a day of it. We purchased the following items:

2 Linnmon table tops, in white, with soft green trim around the edges
8 Adils table legs, in silver
3 Jules Jr chairs, two in white, one in pink ;)
1 Vilgot Swivel chair, in black, for Jordan
1 KNAPPA pendant lamp, 2 spotlights and the Sanda track

I love the black chair as it is super-comfy. I am buying another one for me, in fact, tomorrow, as we will be driving right by Ikea on our way to a school picnic. The one in the pic is Jordan's, the other three are for the little kids. The table tops are terrific. In the past few weeks they have been subjected to pencil, crayon, acrylic paint, ModPodge, Elmer's Glue and cat puke. It all cleaned up beautifully. Mr. Clean's Magic Eraser is your best friend.


We love the new light. I affectionately call it the Giant Cauliflower. It took some considerable dexterity to put it together, but it puts out a ton of soft light on the work surface below. Here is a pic I took at night... The light looks like it is glaringly bright, but that is just the way the picture turned out - but look at how well it illuminates the entire table! The table measures 5' x 5', so it is a pretty big surface.


This is my pride and joy. I first encountered an alphabet wall very similar to this in our pediatrician's office about three years ago.  Ever since I saw it, I wanted to make one for our home, but there was never the appropriate wall space for it. It does take a serious amount of wall space. When this room came to fruition, I thought it would be the perfect place for it. Most of the letters came from Hobby Lobby, the rest from Michael's, and the plate from Target. It took about three solid days of shopping, designing, painting and so forth to finish it. Some letters were as-is, but most of them were embellished in some way. It was hard to get a good shot of the wall from straight-on because of Giant Cauliflower, but here it is. I think my favorite is the letter "B". It is a fancy box from Michael's that is in the shape of a Book, with Butterflies on it. I painted a wooden letter B, in Black, and glued it on. :)

Alphabet Wall Art

This bookcase was built many years ago, and had been banished to the garage a couple years back. I painted it with a fresh coat of white paint, and it lives to see another day! The math manipulatives, which have  lived forever in two large wicker baskets, are now properly sorted and easy to find in their new containers, from the Container Store. LOVE that place, and they were a nice price, too! The shelf next to it holds three stacks of Calvert teaching manuals, one for each kiddo. The other four shelves hold each kid's pile of school stuff.


And that's it! School is in session, and so far, so good. We had a lot of discussion about personal work habits before pulling this room together. Having one giant table won't work for everybody, as some kids need their space. We addressed the needs and concerns for each kiddo.  No, we don't all sit around this table and slog away in our work for hours and hours until it's done. I think over the past week we maybe spent a grand total of 1 hour all sitting at the same space.  During the day the kids come and go as they rotate turns working with me, and it's nice to have such a large table surface to push some work to the side, and pull another pile closer and spread out. Calvert is especially manual-heavy, so I may be managing four different books at one time - plus the kid's stuff!

Many, many thanks to my husband for putting the tables and chairs together and installing the new lights.  The kids helped with the chairs, each getting a turn putting their own chair together.  I feel very, very fortunate to have this space for us to work in. :)


Friday, March 23, 2012

Tuesday, January 24, 2012

Seeing stars


Yesterday, Monday, was Art time.  Another one of my New Year's Intentions is to increase the amount of time we spend on art.  Considering in the past two years we were averaging 1, maybe 2 art projects a year... anything will be an improvement. 

A long, long time ago I purchased one single unit of Meet The Masters from Rainbow Resource.  I think it was something like $27 at the time.  I got the very first one, 'Track A', Ages 5-7.  The entire program consists of Tracks A, B and C - with 3 units (7 artists and techniques are profiled in each unit) each, so there are 9 units all together.  If you purchased all nine, you're talking about a $300 commitment.  So I just bought the first one to see what it was like.  Homeschool Buyer's Co-op does feature a deal from Meet the Masters every once in awhile.

I really do like it.  It only took us about a year to complete the very first project.  I really am lame when it comes to art, and I have no idea why.  I love doing art.  I don't mind the mess.  I am just the queen of getting side-tracked by all the other things that come up in life...

The first project that took us so long to complete was Van Gogh's The Starry Night.  This really is one of my all-time favorite paintings.  We watched the online presentation about Van Gogh and his life as an artist, that comes as part of the curriculum.  We learned about texture and practiced making drawings using different kinds of texture.  The we practiced making spirals and concentric circles.  Finally, we were ready to make our own versions of The Starry Night, using oil pastels on black construction paper.

Here are the final results:
Rylan

Jordan

Mine


I have found that sitting at the kitchen table during a sunny afternoon, with soft music playing in the background (yes, we listened to Don McLean's Vincent... several times over!) and painting/drawing/sculpting with the kids to be one of the most pleasant and therapeutic activities in recent memory.  We will be doing this much more often - it was just so "nice".

I found that as I was listening to the music, I was transported back in time to my high school Humanities Class.  I can remembering picking apart the lyrics of Vincent as part of our studies of Van Gogh.  I also tried to recall art classes during my school years.  I can't remember a thing!   I remember my elementary art teacher's name, I can recall sitting at an art table in Jr. High drawing with pencils, and making Raku pots in Humanities in high school.  That's it.  That's sad!!  I am so thankful that the Meet the Masters program gives some detailed instructions about what we are to do - I could not do this otherwise!

We did learn some interesting facts about Vincent Van Gogh. 

* He was interested in art all of his life, but he only painted during the last ten years.
* Van Gogh produced around 2100 works of art during those ten years.
* Van Gogh only sold one painting during his lifetime - The Red Vinyard, for about $80
* Self-Portrait Without Beard is one of the most expensive paintings sold in all time - it sold for $71.5 million in 1998.

We also went on a virtual field trip to 'see' The Starry Night, where it hangs on a 5th floor gallery wall, at the Museum of Modern Art in NYC through The Google Art Project.  This link will take to you to the exact painting, and will allow you to zoom in so close you can see actual brush strokes, the weave of the canvas and small cracks in the paint.  At the top left of the page, you see two drop boxes - one that indicates you are looking at The Starry Night painting, and the other indicates that you are currently in MoMA.  Click on the MoMA box, and you will 'back out of the painting' and will once again be standing in the gallery.  Now you can move about the entire gallery and look at other pieces of artwork.  You can click on other paintings, and learn all about the artist that made them.  We explored MoMA for a good thirty minutes. Jordan also figured out that you could exit the museum (through the entry/exit doors) and then look around on the city streets outside the museum.  When I was showing Dean the site last night, we left the museum and then actually got lost on the streets of NYC.  Even if we left the page and came back, if we clicked on MoMA, we were still sitting at the same intersection as before.  We had to look up the address of MoMA and read the street signs to navigate our way back.  It was funny, weird and exasperating all at the same time.

So, if you have some time to spare, explore the museum - it's fascinating!  And then, go and explore the several other museums around the world that are a part of the Google Art Project.  Wouldn't it be wonderful if they had the Louvre? 

Friday, July 29, 2011

Art takes time. A lot of time.

Hooray for us - we finally wrapped up an art project!!  Last year, when Jordan attended a one-day-a-week enrichment program, we took advantage of the ability to take home some curriculum for the school year and made Atelier Art one of our choices.  We had to give it back when we left the program in April - which I was pretty bummed about - because it is expensive.  I didn't really start using it until January, so we were just starting to get into it.  So forgive me, this post is so embarrassingly overdue and I have no idea what lesson this project is, or what level it is from.

There are 8 levels, 3 modules each, in Atelier Art.  I know this because I just looked it up.  :)  We belong to Homeschool Buyers Co-op, and they are running a 40% discount on it that ends August 22.  Each module normally retails for around $150, so it is a very good deal.  I can hardly speak with authority here, but the four lessons that we did do were pretty cool.  I *think* we were working within level 4, module A... We first did a lesson on the color wheel, and practiced mixing secondary and tertiary colors.  Then we painted a picture of a hot air balloon with all of the fabulous colors we made...


Then there was a lesson on washing the background with sweeping watercolors in a blue/purple hue, and then cutting out shapes of trees with bare branches, people with umbrellas and birds from black construction paper and arranging them on the background.  It was to depict a rainy day.  I didn't take any photos, unfortunately.  I'm lame like that. 

Then we sort of combined the third and fourth lesson.  I didn't like the finished product in lesson three, but I liked the idea...  Here is what we came up with.  We began in early February.  Yes, February.


Watercolor still life


We began by creating a still life for our inspiration.  We kept it simple but rich in texture: a vase with flowers, a bowl of apples, and a fish sculpture.  I am mostly pleased with this arrangement, but I am bothered by the two 'low' elements, and one 'high' element.  If I were to do this again, I would ditch the fish and go for another item that would be about medium height, in a blue or purple hue.  I think the artistic composition would be more balanced that way.


Hey look!  There is 'Rainy Day' above the flowers!  I'm not lame after all!!
 Then we used several sheets of white tagboard, and gave each one a colorwash using watercolor paints and lots of water, one sheet for each color represented in the still life: yellow, red, blue/green, brown and speckled brown.  We made the speckled brown by washing the paper with brown first, and then taking a brush with a darker shade of brown and flicking it at the paper.


We didn't need a lot of red or yellow, so we divided the sheet in half.
 
Close cat supervision is required at all times for a project of this magnitude.

Owen, of course, doing his own thing...
 Then when the paint is dry, approximately 77 days later (give or take a day), tear the watercolor papers into the shapes you need for each element of the still life.  Small bits for the little yellow flowers, a large red piece for the bowl, long, skinny strips for the branches... etc.  Then arrange them on the paper and glue them down.

You can see the speckled brown in Jordan's paper pile.  He did a great job with that technique.


This part of the project proved difficult for Rylan.  Not quite enough finger dexterity to be able to exert enough pressure to do semi-accurate tearing of the paper, so I helped her with that component.

This part of the project must be supervised by a toddler eating leftover Chinese.
 Then after waiting the required 96 days for the glue to dry, you can then begin the final phase of the project.  Outline the shapes using a pen or pencil (the video showed the instructor using a black felt tip pen, we used plain 'ole black colored pencil), to give further definition to the shapes.


Jordan's finished still life.

Rylan's finished still life

I am very pleased with how they turned out.  I love the rough edges of the torn shapes, and the way they give dimension to the finished piece.  I also love how the color wash gives lots of different color values across the painting, giving a soft, yet cohesive effect - and it lends an element of realism.

So in our household, it takes approximately six months to produce a piece of artwork.  We painted one day, glued the next, and finished by outlining in pencil.  This last push took all of 12 minutes to complete.  I am so tired I think I need to recharge with a cup of coffee and a nap.


What is really silly about this whole thing??  This is the best part about homeschooling!  It's fun!  It is so relaxing to pull out the materials, put on some good music (We listen to Nora Jones on Pandora) and just create.  And I can only seem to manage to do it once every couple of months.  Shame on me.  Shame. shame. shame.  I love doing art.  I don't even mind the mess - unless it involves a small child running through the house with a loaded paintbrush.  It's been known to happen.