Monday, November 14, 2011

Bread Machine Recipe 1 of 4: Butter Crescent Rolls


You will not believe how e*a*s*y this recipe is.  My five year old almost has it down pat.  It takes about SEVEN minutes of minimal labor on your part.  If you love soft, dense rolls, this is the recipe for you!

As long as I can remember, my mom has made these rolls.  She got the recipe from her sister, who got it from a fellow USAF wife in the 70's.  Then, several years ago my aunt came up with a way to make it in the bread machine - thus removing any of the labor that goes along with it. 

Ingredient List:
  • 1/2 Cup of water
  • 1/2 Cup of milk (use whatever % you have on hand - I've even used skim)
  • 1 stick butter, cut into eight equal pieces
  • 1 egg
  • 3/4 tsp salt
  • 1/3 C sugar
  • 4 C flour (you can use regular flour - I use High Altitude unbleached flour)
  • 2 1/4 tsp yeast (I use Fleischmann's BreadMachine yeast, in a jar)/or 1 packet of RapidRise yeast

About 1 hour 45 minutes before you need the rolls (because they are out-of-this-world-good fresh out of the oven), you can start the dough in the bread machine.

First, get a 2-Cup size glass measuring cup - or use a large glass bowl if you don't have one.  Just don't use a single cup glass measuring cup because it will overflow.  Measure the water in your measuring cup, then add the milk.  Take the eight tablespoons of butter and place them in the cup as well.  Microwave the water/milk/butter mixture for 1 min 20 seconds to 1 minute 30 seconds and then pour into the bread machine pan.


Don't ditch the measuring cup yet!  Crack the egg into the buttery cup and mix with a fork for a few seconds and then pour into the pan.


Then pour in the salt, sugar, and flour.


Then add in the yeast.  I buy it by the jar because I make rolls about 3 - 4 times a month.  I should cut back.  But then life would lose all meaning.


Select the dough cycle (the timer should read 1 hour 20 minutes) and start 'er up!  Check the dough about two minutes after you start the machine, because it is notorious for mixing everything underneath, and leaving this heavy flour layer on top.  Scrape the sides and make sure everything is mixing evenly.  The dough should look like this when the machine gets rolling...


When the machine reaches the end of the dough cycle, go ahead and unplug it. Here comes the hard part.
Dust your counter top with flour, lift out the pan and dump.  (now wipe your brow...)


I use a small shaker, filled with flour, to dust the counter and the dough.
Take the dough and divide it in half.  Roll the dough out into a large circle.  It can be just a tad sticky, so keep the flour handy.  Cut the circle in half, and then half again.  Then cut three wedges in each quarter.  I've found that using a pizza wheel makes this job super-fast and easy - the dough won't stick to the wheel either.  I also use it directly on the counter top (which my mother does not approve of), and it has never left a mark.  I also have nineties-era crap Formica counter tops, so I don't really care...


Roll the dough from the wide edge towards the center and place on a ungreased baking sheet.  I do a dozen at a time.  There is no second rising time, so the rolls are ready to pop in the oven as soon as you are done rolling (told you this was easy!).


Bake at 400 F for 8 - 10 minutes.  I prefer my rolls soft and underdone, so I bake mine at 390 F for 9 minutes.  Every oven is different, so experiment and find out what works for you.  I immediately place them on a cooling rack, and place the next twelve rolls (which were already rolled and left waiting in the counter) on the same warm baking sheet and put the next batch in the oven.  I don't try to bake both dozen at once - they never turn out as well for me, even if I switch the pans around halfway... 


And there you have it!  They keep well in the fridge, and you can also make ahead and freeze.  My mom makes a batch, freezes them, and then pulls a roll out here and there and microwaves it to heat it up.

Variations:

You can add herbs to the dough mixture when you add the flour.  I often add a little dried dill, oregano, basil or a dash of sage - just use what you like!

A breakfast variation might be to mix a mash of butter, brown or white sugar and cinnamon.  Spread it into a thin layer on a peice of waxed paper and freeze it for a half hour.  When you roll out the dough, cut the frozen butter mixture into little peices and sprinkle onto the dough and then roll up the cresent rolls.  I just thought of this, so I haven't tried it yet, but gosh that sounds good.  Hmmmm....

Happy baking!!!

Weekend Project: building a wall

We're not hoarders...just never-put-awayers

We don't let small children wander downstairs into the basement.  For no other reason than that they might end up trapped under a pile of schtuff.  We have lots of schtuff.  Boxes of old school paperwork.  Teaching schtuff.  Baby schtuff.   The kind of schtuff that happens when you combine two households and half of it gets relegated to some other space.  It was semi-organized at one point.  Then, around this time last year, we had the bright idea that it was time to prep the basement for finishing.  Our mission was to clear out about two-thirds of the schtuff.  We began by pulling the eight bookcases that lined the longest wall, and moved them all to our master bedroom.  Then I could - at a leisurely pace - begin to toss/donate all of the books, CDs, cassette tapes (what are those again?), and VCR tapes that we didn't want.  For the past eleven months I've tossed like five books.  I've picked up the pace in the past month and have now donated A CAR LOAD.  I still look at the books that are left and wonder why do I still have my Plant Biology 101 textbook?  Why do I have six different First-Year Teacher prep books?  WHY?

So when we moved the bookcases, everything that was either on them or in the way had to be shoved in a big pile into the middle of the room so that we could get them out.  The big pile is still there, only it's even bigger now.  We were stopped in our clearing-the-clutter tracks by evidence of mice.  Lots of evidence.  Then we discovered a nice little hole that they were using to get in.  Right near the sweet spot of a heating duct, where the foundation and wall meets.  And then another hole.  And then a third one.  And then a hole that was chewed away near the dishwasher grey water pipe, that allowed the mice access to the kitchen sink cabinet... and of course,  the kitchen itself.  AAAAGGGGHHHH!!  Yuck!  So the clearing-out project was temporary scraped and we took on a new project:  Kill the mice and plug the holes.

We attacked on both fronts.  Armed with spray-on expanding foam, screws, boards and insulation, Dean patched and plugged the holes, and also discovered another problem.  Right above the main hole the mice were using to get in is the bay window in our kitchen.  The subfloor had separated from the sole plate just enough that there was a good 1- inch gap that was hanging down - a nice entry point for vermin.  While drilling a peep hole from the basement side (at the top of the foundation wall) to see into that bay window area, Dean also saw that the builders 'forgot' to put any insulation under that section of floor.  In the winter time, if you stood barefoot on the kitchen floor, with one foot in the bay window area, and one foot on the regular kitchen floor, it would feel like you had just stepped onto ice.  No wonder!!  So Dean drilled several peep holes into that section, and then stuffed the whole cavity with cellulose insulation.  What a mess...  All of the peep holes are filled up with the expanding foam now, and you can't feel that cold draft anymore.  It just makes me mad about all of the heat energy that has been wasted all these years. 


The peep holes that were drilled to look into the cavity under the bay window.
 
The mice were getting in via a small hole right next to the vent (which comes up in the bay window area).  We knew to look there because the cat would routinely sit right beside the vent, listening to the mice scratching away underneath the floor.
With the multiple holes discovered and then plugged, we could now go after the mice.  Eight of them in all, as it turned out.  Snap traps proved to be the quickest and most effective, and we found peppermint patties to be the most desirable bait.  Since there were mice running amok in the basement, there was mice poop in just about everything.  They had chewed holes in a couple of things, so I wasn't taking any more chances.  I snatched up the most important things and found new homes - upstairs and out of the basement.  I made the decision to move all of our Christmas stuff upstairs to a closet in one of the kids' bedrooms.  Since we don't keep clothing in there, I could fill it completely with Christmas stuff.  It is packed to the gills, but amazingly enough it all fit - including the Christmas tree.  The nice thing is that I can't/don't need to purchase any more Christmas decorations... there is no room to store it!!  If I do get something, then something else has to go.  I think the 'Christmas Closet' deserves it's own post...

Then all work stopped.  Spring was here, and we wanted to be outside.  We dragged up all of the camping gear and put it in the garage, so that we could have easier access to it over the summer months.  I was ditching baby gear left and right as Colin no longer needed things, and the basement pile was growing.  Nothing was getting put away.  Then, late one night, Dean and I decided that we had had enough of the kids not putting their toys away, so we cleared out a semi-filled shelving unit and stuffed it full of toys we confiscated from the upstairs playroom.  Over the past few months, the kids have been swapping out toys - and yet nothing gets put back. 

So now our basement looks like this...


The first sign of laziness - open the basement door and chuck it down the stairs...

View from the bottom of the stairs.  Remnants of camping, Halloween and toy raids remain...

View from the bottom of the stairs looking into the larger area.  I feel..... faint...


View from far corner of the basement.  A pile of "What the hell do we do with this crap??....along with another pile.  And another... and another.  If you look closely, you can see Jordan's head peeking up over the pile. 
 
School files.  None of these files have been opened in the seven years we have been together.   Seriously... WHY do we need to keep this stuff??  Don't get me started on the china... 
 
View from the opposite end of the room.
 
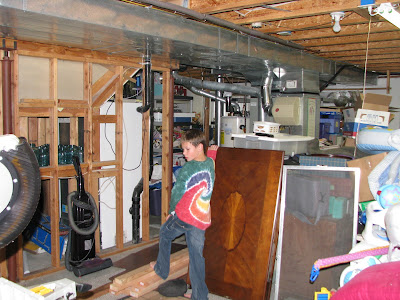
Jordan standing with his foot on a pile of 2x4s that are about to become a wall...

Shop area that is about to be walled-off.  Dean is hanging a plumb bob (behind the circular table saw).  This is the first step to finishing the basement - wall off the 'room of serious injury and possible death'.  We need this place to be kid-safe.


Done!
This latest stage of the project took the better part of this past Saturday afternoon and evening, but it went very smoothly.  Dean used a ram set to nail the sole plate (the board that goes across the bottom) into place.  It is built to code - so the wall must be a floating wall, attached to the top plate.  The ram set was quite impressive - you load it with the equivalent of a .22 caliber shot in order to drive the nail into concrete.  It was very loud.  Even more so since it was bedtime for kids at that point.  :)   You will notice that a section of the wall does not have braces (I think that is the right terminology...)  This is a future doorway.

I am so glad that the work is finally starting.  Due to our very tight budget constraints, the work will be at a snail's pace, but that is fine with me.  This was a nice, weekend-length sized chunk, and about a month from now, on another weekend, we can set another $50 aside and put up drywall.  In the meantime, we can continue on clearing the clutter, 15 minutes at a time.  I would think that in a month from now, most of the floorspace (in the larger room) will finally be cleared.  Oh, how I hope so...